|
|
|
|
:VERUS NEMO MEMINISSAT:
:FALSUS NEMO OBLIVISCAT: |
| # lines | data format | table name | data meaning |
|---|---|---|---|
| 1 | str | eigen file name | |
| 1 | str | default texture file name | |
| 1 | int | BONECT, bone name count | |
| BONECT | str | BoneNames | bone name |
| 1 | int | FACECT, facet count | |
| FACECT | int, int, int | Facets | vertex 1, vertex 2, vertex 3 |
| 1 | int | BMAPCT, bone map count | |
| BMAPCT | int, int, int, int, int | BoneMaps | bone number, vertex begin, vertex count, blend begin, blend count |
| 1 | int | UVMAPS, UV map count | |
| UVMAPS | fp, fp | UVMaps | UV X fraction, UV Y fraction |
| 1 | int | BLENDS, blend data count | |
| BLENDS | int, 16int16 | Blends | influenced vertex, blend weight |
| 1 | int | VECTCT, vector count | |
| VECTCT | fp, fp, fp, fp, fp, fp | Vectors | point vector X, Y, Z, normal vector X, Y, Z |
The 'default texture file name' is the name of a .BMP file without the .BMP extension. (The .BMP file must be 64x64, 128x128, or 256x256 pixels, 8b paletted.) No error is signalled if the .BMP file cannot be found. Most developers put 'x' on this line when they want to indicate no default specified. Generally, the default texture file name determines what gets mapped onto the mesh, but if the skin file is the first referenced in a character (.cmx) file, the default texture file name will be ignored.
In BoneNames, the bones may be listed in any order. Apparently the order must correspond either to the record order of BoneMaps or the 'bone number' values in BoneMaps, but see BoneMaps below.
In Facets, the facets are one-sided. The order of the facet records is not significant. The vertices of a facet are listed clockwise from the viewable side. The choice of starting vertex is not significant (eg 4 10 6, 10 6 4, and 6 4 10 are all equivalent).
In BoneMaps, 'bone number' appears to be a repeat of the record number. If this is not redundant, it is probably an index into BoneNames. Simshow ignores this number and requires BoneNames and BoneMaps to be in the same order.
Every vertex is bound to a bone. (Any vertex floating around without a bone cannot be animated, and would probably cause very strange rendering artifacts, or just crash the game.)
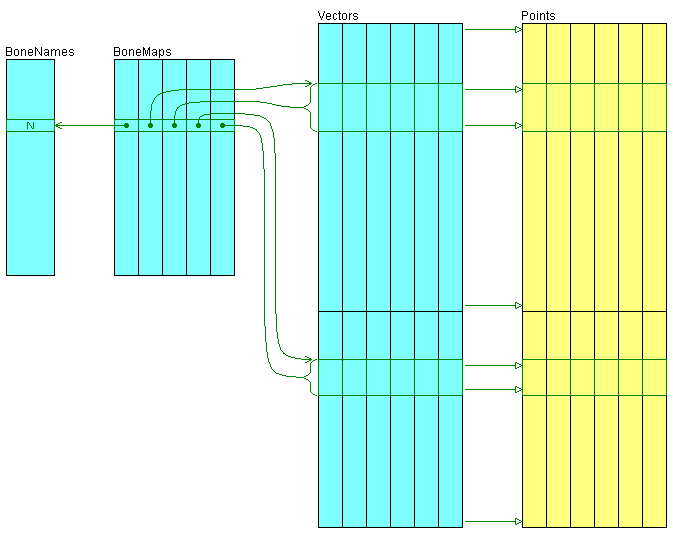
'Vertex begin' and 'vertex count' describe a range of records in UVMaps, and a corresponding range of records in Vectors. For an empty range, 'vertex begin' = -1 and 'vertex count' = 0.
'Blend begin' and 'blend count' describe a range of records in Blends, while 'blend begin' + UVMAPS and 'blend count' describe a corresponding range of records in Vectors. For an empty range, 'blend begin' = -1 and 'blend count' = 0.
Each Blends record associates a point from the second list with a vertex from the first list.
The point record from the second list is located by adding UVMAPS to the record number of the blend data. This is the "anchor" point, which exerts a pull on the selected vertex. The vertex record from the first list is given by 'influenced vertex' in the blend data record. This is the "target" vertex, which will be pulled out of its calculated position by the blend.
'Blend weight', the second integer in the blend data record, represents the strength of the displacing force. R. R. Ward reports that the displacing force is recorded in "16.16 fixed point format", but doesn't say what that means. Here are some guesses:
| '16' refers to the number of decimal digits; 16 significant of which 16 are fractional. Interpret by moving the decimal point leftward 16 places. | '16' refers to the number of binary digits; 16 significant of which 16 are fractional. Interpret by dividing by 2^16 (65536). | |||||||||||||||||||||||||||||||||||||||||||||||||
|
|
Move each bone to its new co-ordinate position and rotation.
Result: bone position and orientation list 'BonePosns' indexed by name.
For each record, use 'bone number' to locate a record in BoneNames, and use 'bone name' to locate a record in BonePosns -- or something like that. Use the position and orientation data from the BonePosns record to calculate a 3D point mapping.
Use 'vertex begin' and 'vertex count' from the BoneMaps record to identify a set of records in Vectors. Map each vector in the set, writing the result into the corresponding position in a new vector list 'Points'.
Use 'blend begin' + UVMAPS and 'blend count' from the BoneMaps record to identify a set of records in Vectors. Map each vector in the set, writing the result into the corresponding position in a new vector list 'Points'.
Result of scan: repositioned vector list 'Points' with structure and record count identical to Vectors.
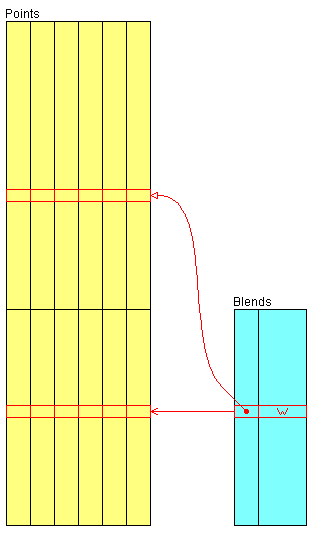
For each record, use the record number + UVMAPS to find a record in Points; this is the "anchor" point. Use 'influenced vertex' to find a record in Points; this is the "target" vertex. Use the anchor point and 'blend weight' to modify the target vertex.
The modification calculation is:
TARGET = TARGET + ( TARGET - ANCHOR ) * weight
Where 'ANCHOR' and 'TARGET' are vectors, and 'weight' is a scalar.
I don't know if the normal vector numbers from the anchor point record are used. The normal vectors could be combined via the same calculation as used on the point vectors, but it seems like a lot of extra work for something that would have such a tiny effect on the facet illumination.
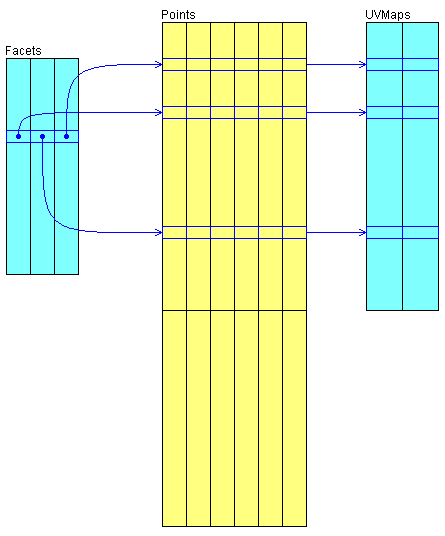
Scan the Facets list, using the triplets to index into UVMaps and 'Points', etc.